메모
전체 예제 코드를 다운로드 하려면 여기 를 클릭 하십시오.
멋진 상자 그리기 #
다음 예에서는 시각적 속성이 다른 상자를 그리는 방법을 보여줍니다.
import inspect

import matplotlib.pyplot as plt
import matplotlib.transforms as mtransforms
import matplotlib.patches as mpatch
from matplotlib.patches import FancyBboxPatch
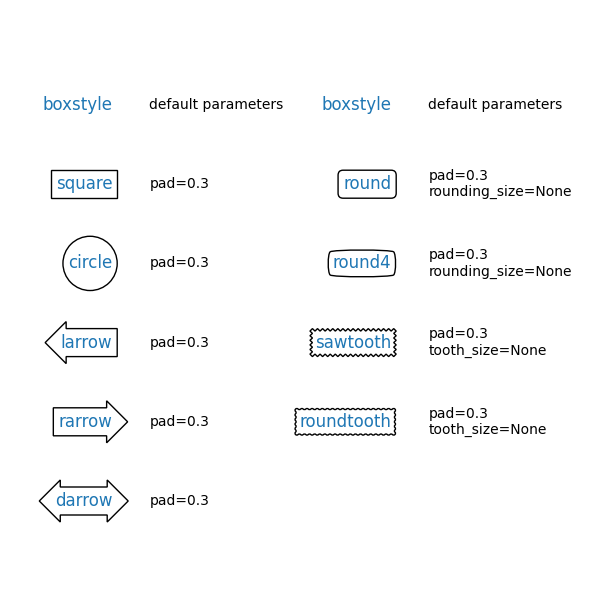
먼저 fancybox가 있는 몇 가지 샘플 상자를 보여드리겠습니다.
styles = mpatch.BoxStyle.get_styles()
ncol = 2
nrow = (len(styles) + 1) // ncol
axs = (plt.figure(figsize=(3 * ncol, 1 + nrow))
       .add_gridspec(1 + nrow, ncol, wspace=.5).subplots())
for ax in axs.flat:
    ax.set_axis_off()
for ax in axs[0, :]:
    ax.text(.2, .5, "boxstyle",
            transform=ax.transAxes, size="large", color="tab:blue",
            horizontalalignment="right", verticalalignment="center")
    ax.text(.4, .5, "default parameters",
            transform=ax.transAxes,
            horizontalalignment="left", verticalalignment="center")
for ax, (stylename, stylecls) in zip(axs[1:, :].T.flat, styles.items()):
    ax.text(.2, .5, stylename, bbox=dict(boxstyle=stylename, fc="w", ec="k"),
            transform=ax.transAxes, size="large", color="tab:blue",
            horizontalalignment="right", verticalalignment="center")
    ax.text(.4, .5, str(inspect.signature(stylecls))[1:-1].replace(", ", "\n"),
            transform=ax.transAxes,
            horizontalalignment="left", verticalalignment="center")

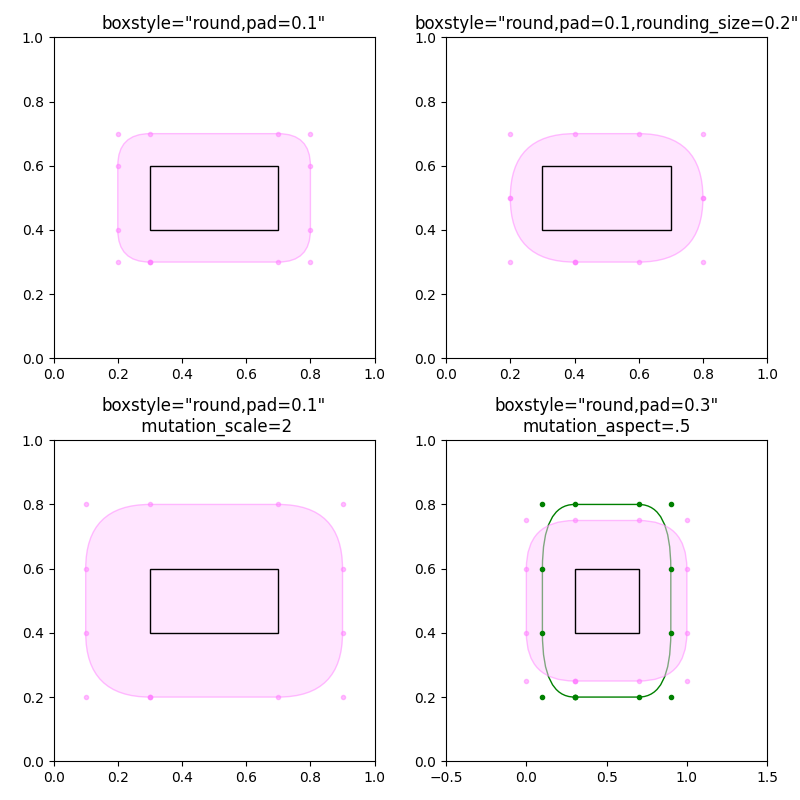
다음으로 여러 멋진 상자를 한 번에 보여드리겠습니다.
def add_fancy_patch_around(ax, bb, **kwargs):
    fancy = FancyBboxPatch(bb.p0, bb.width, bb.height,
                           fc=(1, 0.8, 1, 0.5), ec=(1, 0.5, 1, 0.5),
                           **kwargs)
    ax.add_patch(fancy)
    return fancy


def draw_control_points_for_patches(ax):
    for patch in ax.patches:
        patch.axes.plot(*patch.get_path().vertices.T, ".",
                        c=patch.get_edgecolor())


fig, axs = plt.subplots(2, 2, figsize=(8, 8))

# Bbox object around which the fancy box will be drawn.
bb = mtransforms.Bbox([[0.3, 0.4], [0.7, 0.6]])

ax = axs[0, 0]
# a fancy box with round corners. pad=0.1
fancy = add_fancy_patch_around(ax, bb, boxstyle="round,pad=0.1")
ax.set(xlim=(0, 1), ylim=(0, 1), aspect=1,
       title='boxstyle="round,pad=0.1"')

ax = axs[0, 1]
# bbox=round has two optional arguments: pad and rounding_size.
# They can be set during the initialization.
fancy = add_fancy_patch_around(ax, bb, boxstyle="round,pad=0.1")
# The boxstyle and its argument can be later modified with set_boxstyle().
# Note that the old attributes are simply forgotten even if the boxstyle name
# is same.
fancy.set_boxstyle("round,pad=0.1,rounding_size=0.2")
# or: fancy.set_boxstyle("round", pad=0.1, rounding_size=0.2)
ax.set(xlim=(0, 1), ylim=(0, 1), aspect=1,
       title='boxstyle="round,pad=0.1,rounding_size=0.2"')

ax = axs[1, 0]
# mutation_scale determines the overall scale of the mutation, i.e. both pad
# and rounding_size is scaled according to this value.
fancy = add_fancy_patch_around(
    ax, bb, boxstyle="round,pad=0.1", mutation_scale=2)
ax.set(xlim=(0, 1), ylim=(0, 1), aspect=1,
       title='boxstyle="round,pad=0.1"\n mutation_scale=2')

ax = axs[1, 1]
# When the aspect ratio of the axes is not 1, the fancy box may not be what you
# expected (green).
fancy = add_fancy_patch_around(ax, bb, boxstyle="round,pad=0.2")
fancy.set(facecolor="none", edgecolor="green")
# You can compensate this by setting the mutation_aspect (pink).
fancy = add_fancy_patch_around(
    ax, bb, boxstyle="round,pad=0.3", mutation_aspect=0.5)
ax.set(xlim=(-.5, 1.5), ylim=(0, 1), aspect=2,
       title='boxstyle="round,pad=0.3"\nmutation_aspect=.5')

for ax in axs.flat:
    draw_control_points_for_patches(ax)
    # Draw the original bbox (using boxstyle=square with pad=0).
    fancy = add_fancy_patch_around(ax, bb, boxstyle="square,pad=0")
    fancy.set(edgecolor="black", facecolor="none", zorder=10)

fig.tight_layout()


plt.show()

참조
다음 함수, 메서드, 클래스 및 모듈의 사용이 이 예제에 표시됩니다.
matplotlib.patches.BoxStyle.get_styles
스크립트의 총 실행 시간: (0분 1.556초)